¶ Intro
In this tutorial, I'll show you exactly how to setup a virtual machine using an Ubuntu 22.04 LTS server connected via ssh. I'll also give you a look into my personal hypervisor platform I've created that has automated virtual machine creation scripts to show you a real-world application of these commands I'll show you.
This tutorial will cover the following topics:
- Writing the commands to use with KVM to create a vM
- How to connect to the VM
- Network bridging for the guest VM
¶ Installing KVM and Other Required Packages
This section is quick because it's literally just one command needed to install everything.
sudo apt install qemu-kvm libvirt-daemon-system libvirt-clients bridge-utils virt-install virt-manager -y¶ Configuring Permissions for KVM
Once you install everything, you need to add yourself to the KVM group so you can run KVM commands without needing “sudo" in front of them.
To do this, you need to run the following command, but replace USER with your username (for both commands)
sudo usermod -aG USER kvm
sudo usermod -aG USER libvirt
¶ (Legally) Obtain an ISO
Similar to how Windows used to work back in the day with a CD disk that was needed to install Windows, you need to have a disk image in order to create the virtual machine. In this tutorial I'll show you how to create an Ubuntu VM since it's super easy, so head to https://releases.ubuntu.com/ to download an ISO. BUT WAIT, you don't need to download it to your computer. Since you're connected to your server over SSH, you can actually directly download the ISO to your server!
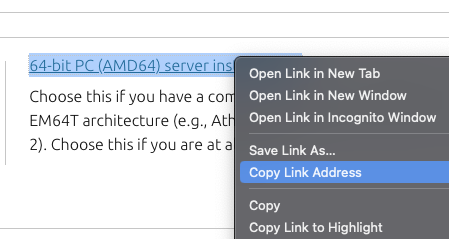
Once you find the Ubuntu version you want, find the server install image section and right click, then click Copy Link Address. That button will look something like this:
Then, go back to your SSH connection, and format your command like this:
wget <url>Replace <url> with your url you copied, click enter to run the command, and it should be downloading!
¶ Create your VM's disk image
This should be pretty simple. Navigate to the directory you want your VM's disk image in and you will run the qemu-img command below to create the disk image. More information on that is available here (I made a separate tutorial about that awhile ago)
Format this command by replacing the example options with your own. Note: I would change demo.qcow2 to something else like your VM name which could be tutorial-vm.qcow2. Also change 25G to however many GB you want your VM to have.
qemu-img create -f qcow2 -o preallocation=off demo.qcow2 25G
¶ Time to Create the VM!
This will probably take awhile to format this command, but here's the general format you should go for:
virt-install \
-n my-vm \
--osinfo=ubuntujammy \
--memory=4096MB \
--vcpus=2,sockets=1,cores=2,threads=1 \
--cpu host \
--network type=direct,source=vlan70,source_mode=bridge,model=virtio \
--disk='/home/beamnetworks/virtual-machines/demo.qcow2',bus=virtio \
--location=/home/beamnetworks/jammy-live-server-amd64-latest.iso,kernel=casper/vmlinuz,initrd=casper/initrd \
--noautoconsole \
--graphics=vnc,password=password,listen=0.0.0.0You'll notice a lot going on here, so here's a list of generally every part of the command and what it does, so that you can format it however you'd like.
- -n: Name of your VM, no quotation marks needed
- --osinfo: Operating system your VM will be running, list of them available here.
- --memory: Amount of RAM your VM has in MB
- --vcpus: Total number of cores and threads (ex. 2c 2t = 4), sockets are how many cpu sockets the cores will be split between.
- --cpu: “host” means it'll passthrough the host's cpu information to the guest
- --network: The format given lets you replace “vlan70” with whatever vlan number you want, or your network interface like eth0. You can find your available interfaces by running
ip a. - --disk: Path to the .qcow2 disk you created
- --location: Path to the ISO image you downloaded, also need to specify the kernel you will boot from (if it's ubuntu you can leave it the same as what I have written above)
- --noautoconsole: Doesn't automatically “lock" you into the console once you create your VM
- --graphics: Sets the display output to be a VNC server you can connect to. You can edit the password after the “password=” argument, and it just needs to be less than 8 characters.
¶ Connecting to your VM
Once you run the install command and it works successfully, you can now connect to your VM!
First, make sure it's actually running, you can do this by running the command below:
virsh listNext, you'll need to find the VNC port for your VM. You can do that by running this command (replace my-vm with your vm's name listed in the previous command):
virsh -c qemu:///system vncdisplay my-vmFrom a separate computer, connect to the VNC server. If you are on a Mac, you can do this directly from Finder. Click Finder and on your keyboard click Command + K. It'll pull up a menu and you can type in vnc://<server-ip>:<port> (replace the <server-ip> and <port> with the information you got previously).
That's all!
¶ Bonus: Commands to control your VM:
Here are a few commands you can use to manage your VM.
List all running VM's:
virsh list
Shutdown VM:
virsh shutdown <vm-name>
Start VM:
virsh start <vm-name>
Force Shutdown VM
virsh destroy <vm-name>
Like always, feel free to reach out on my website, beamnetworks.dev.