¶ Intro
Today I was trying to configure one of my new Raspberry Pi's that I was able to get from Adafruit to connect to my iPad for a portable Pi setup for me to be able to experiment with new applications and softwares before pushing them to my “production” environment. I found myself combining many different directions from different forums and YouTube videos, so here's what I ended up doing all written in one place for my future reference as well as a reference for anybody trying to do the same thing.
¶ Flashing the Pi
No, not what you think this is about.
You'll want to download the Raspberry Pi Imager software to allow you to put whatever operating system onto the Pi's SD card. In this tutorial, I am using Ubuntu 22.04 LTS Server (64-bit), however 32-bit or 64-bit of the Ubuntu server options or Raspberry Pi OS options should work as well with no issues. Note: I'd recommend using the Raspberry Pi OS Lite for beginners since it's easy to use and lightweight!
As seen in the image above, there are many options. Once you select your software and your storage device, BEFORE WRITING THE FIRMWARE, I'd recommend clicking the settings option found in the bottom right to customize your hostname as well as to enable SSH which will allow to setup the Pi without needing a monitor at all!
Click WRITE before continuing.
¶ Modifying the boot configs
¶ Credit to the user “jreich” on the Raspberry Pi forums for the following configuration
Before putting the SD card into the Pi, you'll need to edit a couple files on the SD card to basically tell the Pi to enable USB over Ethernet on it's USB C port. This was actually pretty straight forward once I found the right tutorial haha.
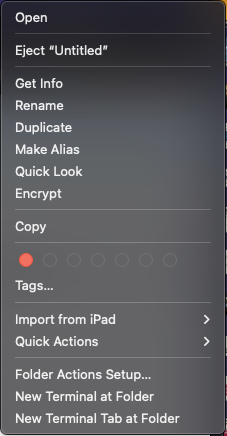
On a Mac, once you flash the software, you will want to first unplug it, and then plug it in again to reconnect it so it shows up on your desktop. Next, you'll want to right click it and click “New terminal at folder”. You'll see this in the screenshot below as an option near the bottom of the menu.
Once you open Terminal at folder, you'll want to run the command ls to display the available files on that SD card. Just check to make sure you have the two following files:
config.txt
cmdline.txtNow, run the command nano config.txt since this will be the easiest way to edit the file. In the config.txt file, you need to add some options to the file. Use the arrow keys up and down to navigate through the file. Once you scroll down, you already may see dtoverlay=dwc2,dr_mode=host but you need to change “host” to “peripheral”. The code for that line should look like this:
dtoverlay=dwc2,dr_mode=peripheralTo close out of the file, on your keyboard, click the following combinations of keys in the same order:
ctrl+x
y
enterBasically ctrl+x will close the file, y will save it and enter will confirm your options.
Next, run the nano command again to edit a different file this time called cmdline.txt . In this file, use your left and right arrow keys to scroll horizontally through to find the section that says rootwait. You will want to add a space after that and type in the following code (and make sure to have a space afterwords, although it should already be there)
modules-load=dwc2,g_ether¶ Connecting the Pi to Your iPad
Great job, you're almost done. Now that there is a network link between the Pi and your iPad, you just need to configure it so that they can communicate over that link. In order to do this, you'll need to setup a DHCP server (it's very simple I promise).
Now, close out of your terminal window and eject the SD card from your computer and then put it into the Pi and boot it. Then, connect to it using the Hostname you configured earlier in the Raspberry Pi Imager. Use the following format in a terminal. Replace {{username}} and {{hostname}} with your actual values you inserted into the Pi imager.
ssh {{username}}@{{hostname}}.localOnce you get connected, run the following commands to update your Pi.
sudo apt update -y && sudo apt upgrade -y && sudo apt autoremove -yNow, run this command to install isc-dhcp-server which will allow the iPad to easily connect to the iPad
sudo apt install isc-dhcp-server -yNext, run nano to edit the file /etc/dhcp/dhcpd.conf.
Inside of that file, ensure the following code IS THE ONLY UNCOMMENTED SECTION OF TEXT (excluding the comments):
option domain-name "ipad-pi";
default-lease-time 600;
max-lease-time 7200;
ddns-update-style none;

# This is the DHCP configuration file for the network 100.127.15.1/27
subnet 100.127.15.0 netmask 255.255.255.224 {
  range 100.127.15.1 100.127.15.31;
  default-lease-time 600;
  max-lease-time 86400;
}

# DHCP options
option subnet-mask 255.255.255.224;
option broadcast-address 100.127.15.31;
option routers 100.127.15.1;
option domain-name-servers 1.1.1.1, 1.0.0.1;This will configure a dhcp server to hand out addresses on the 100.127.15.1/27 network.
¶ Configure NetPlan
This is the last step! You'll need to run the command:
sudo nano /etc/netplan/ but at the end after typing that, click tab on your keyboard to autofill in your Pi's filename.
Once you open that file, remove any existing code and paste in the following configuration:
network:
  ethernets:
    eth0:
      dhcp4: yes
      optional: true
    usb0:
      dhcp4: no
      addresses:
        - 100.127.15.1/27
      optional: true
version: 2This will assign a static IP to the network interface that your Pi's USB C port uses for Ethernet (and power)
¶ Wrapping Up
Finally, you need to restart some of the services on your Pi for them to load automatically on reboot. You can do that with the following commands:
sudo netplan apply
sudo systemctl enable isc-dhcp-server
sudo systemctl restart isc-dhcp-serverThen, reboot your Pi by running sudo reboot. That's all!